

How To Change The Sand In A Sand Filter
How to Change Sand in Your Puddle Filter
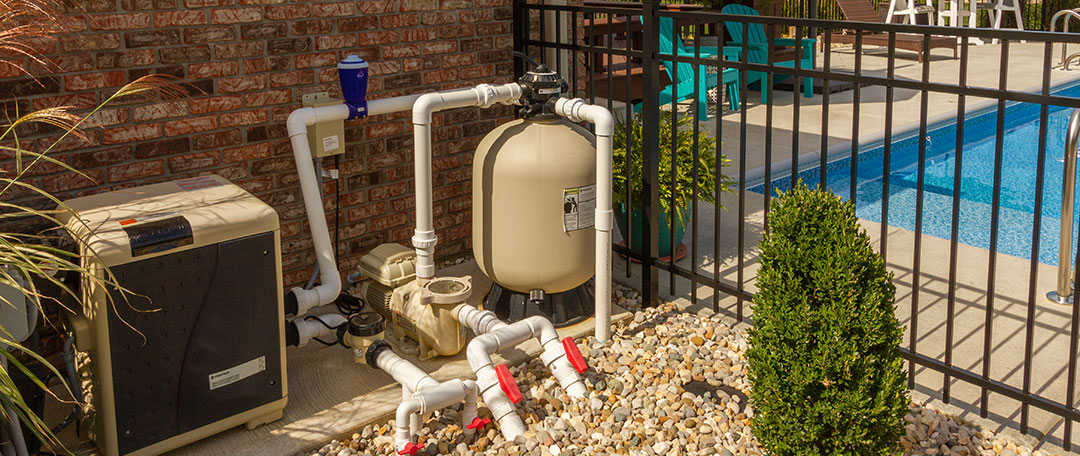
A sand filter pushes your puddle water through layers of sand, which functions as the filtration medium in the filter tank. The sharp edges of the sand grains capture contaminants as the water passes through the filter.
Most sand filters use several graded layers of material to clean the water. Coarse sand is the lesser layer of the sand bed, followed by medium then fine sand, with very fine silica sand on the meridian.
Did Yous Know?
The size of the sand granules is disquisitional for optimum filtering efficiency. If the granules are too big, you'll come across less filtering efficiency; if the granules are also small, y'all risk bottleneck the filter quickly.
Chemic flocculants or diatomaceous world (DE) pulverisation tin likewise be spread over the summit layer of sand to meliorate the filter performance. Flocculants attract floating microscopic droppings and cluster the particles together into chunks large enough to sink and be vacuumed up. DE powder is pulverized plankton fossils (called diatoms) that coats the filter element to collect impurities.
Exit a space of virtually half the depth of the filter bed between the sand bed and the overdrain, to give the filter plenty of room to function properly.
How to Alter the Sand
Changing filter sand is a fairly complex process. The adept news is that a sand filter can get almost a long time without needing fresh sand.
Did Yous Know?
A picayune debris can actually aid in filtration. When the sand bed is completely clean, some of the smallest particles will pass through unfiltered. As the sand bed begins to accumulate the impurities, the filter can take hold of more and more as accumulated particles concenter.
Step 1. Get the Correct Equipment
Be sure y'all have everything you need on paw before you brainstorm the procedure. Your list of essentials tin include sand, a replacement O-ring between the valve and the tank, Teflon tape, lubricant, and unions.
Only utilize pool filter sand that is approved past your manufacturer. If you have whatever questions most what kind of sand y'all demand, bank check with your local pool retailer.
Pro tip: Your pool filter has many minor yet important components. Ever place items similar your filter drain cap in a safety, memorable place and then you lot can find them easily during reassembly.
Step ii. Plough the Power Off
Plough off the pool pump and timer (if you take 1). Better yet, shut off the power to the pump at the excursion breaker.
Step three. Drain the Tank
Remove the bleed cap at the lesser of your filter tank to release the pressure in the filter and drain the water. Give the drain cap at the bottom of the tank simply half a turn counter-clockwise to allow out all the air. Subsequently a burst of air pressure, remove the cap to drain out the h2o. If you don't want the water emptying directly onto the footing, quickly attach a hose over the drain after you remove the cap to direct the draining water elsewhere.
Stride 4. Remove the Multiport Valve
Disconnect the pump, return, and waste hoses fixed to the multiport valve at the tiptop of your filter. Afterwards those port attachments are off, take out the multiport valve flange clamp that secures the filter in place. Unscrew the bolts that carve up the clamp, and pull deliberately and consistently to lift the valve off the pipe.
If your multiport valve has unions, only unscrew them from the multiport valve. If you lot do not have unions, you'll demand to cut the pipes running to and from your filter. It might be a skillful fourth dimension to install unions before reassembling to make hereafter maintenance easier. Brand certain you leave enough exposed pipe later the cutting to add both sides of the unions.
Pro tip: Utilise a very gentle twist to pull the valve off the pipage. Yanking too hard will probable break the lateral pipes at the bottom of the tank.
Step 5. Remove the Old Sand
As soon as y'all disconnect the pipage from the multiport valve, record the stop of the piping airtight to prevent sand from entering it and bottleneck the laterals. After you tape off the pipage, empty out all the existing sand. Scoop it out with a plastic cup – or vacuum it out with a shop vac – until the superlative of the laterals at the bottom of the tank are visible.
Pace 6. Withdraw the Lateral Assembly and Pipe
Slowly rotate the 10 lateral pipes upwards, then smoothly pull the lateral assembly and pipe out of the balance of the sand. Inspect the laterals for damage, supervene upon any that look cleaved or worn out. Clogged laterals should be soaked in a bucket of cleaning solution for a few hours, and so thoroughly rinsed and reinstalled onto the assembly.
Stride 7. Launder the Tank
Thoroughly wash out the tank with a garden hose. Check the drain cap, and swap information technology out with a new one it if yous find any cracks. Fill the filter tank hallway upward with water to provide a cushion and protect the laterals from getting clogged when you cascade in the new sand.
Step viii. Replace the Lateral Assembly and Pipe
Insert the lateral assembly and pipe back into the tank, with the x laterals rotated up. One time the lateral assembly is secured, plough all the laterals 90 degrees back to their downward position.
Step 9. Add Fresh Sand
Tape off the top of the pipe to prevent sand from entering and clogging the laterals. Keeping the pipe centered in the tank, carefully and slowly pour sand into the filter unit of measurement. Add plenty sand so that the laterals are completely covered. Level the sand as yous cascade to ensure even sand distribution for effective filtration and water circulation.
Pro tip: When calculation new sand, accept care not to lift the lateral assembly and pipe off the bottom of the tank. You won't be able to push it back downwardly without rotating the laterals up, and upward-facing laterals will prevent proper filtering.
Footstep 10. Inspect (and maybe replace) the O-Ring.
Remove the O-ring at the lesser of the multiport valve and inspect for excessive habiliment-and-tear. Since you only perform this process every v years or so, it'south a smart choice to go ahead and replace the O-ring now, even if yours is in decent shape. O-rings are really inexpensive, and they do wearable out.
Of form, if you lot don't replace the O-ring, brand sure to lubricate information technology sparingly with a silicone-based lubricant.
Step 11. Re-ready the Multiport Control Valve
Remove the record from the end of the piping, and carefully set the multiport control valve back in its original position on the central pipe. Secure the valve clamps around the tank and tighten them into identify. Reconnect the unions with the pool pump and the return ports.
(If your filter doesn't accept unions, gum the pipes back together with straight couplers.)
Step 12. Backwash the Filter
With the pump still switched off, rotate the valve handle to the "Aftermath" setting and then turn on the pump. Afterward it's fully primed, run the pool pump for about two minutes to affluent out the impurities in the water and the effectively sand particles from the sand media, and to ensure that your pool water waste matter is exiting at the right place.
In one case the backwash h2o runs clear and clean, turn the pool pump off. Switch the multiport valve to "Rinse," so turn the pump dorsum on. Afterward about a minute, the h2o in the sight drinking glass should be articulate.
Pace 13. Enjoy!
Turn the puddle pump back off and set the valve to "Filter" (the normal operating way). Plow the pump back on, and go set up to enjoy your swim!

How To Change The Sand In A Sand Filter,
Source: https://www.swimmingpool.com/maintenance/pump&filter/changing-sand-in-your-pool-filter/
Posted by: najerafortionle.blogspot.com
0 Response to "How To Change The Sand In A Sand Filter"
Post a Comment